G2H2 Windows Quick Start Guide
What You Will Find In Your Kit
Congratulations on getting a Development Kit. We would like to show you around.
Find These First
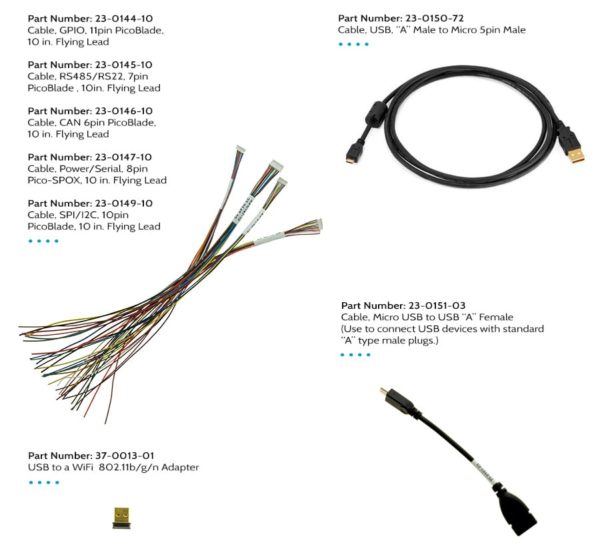
In addition to the display module, here are the items you’ll find in your G2H2 kit. Additional accessories can be purchased online should you need them for prototyping or to replace items that have broken.

Watch this video to see how to set the G2H2 module up for basic operation.
Other Accessories
These items will come into play later in development.
To start the demo:
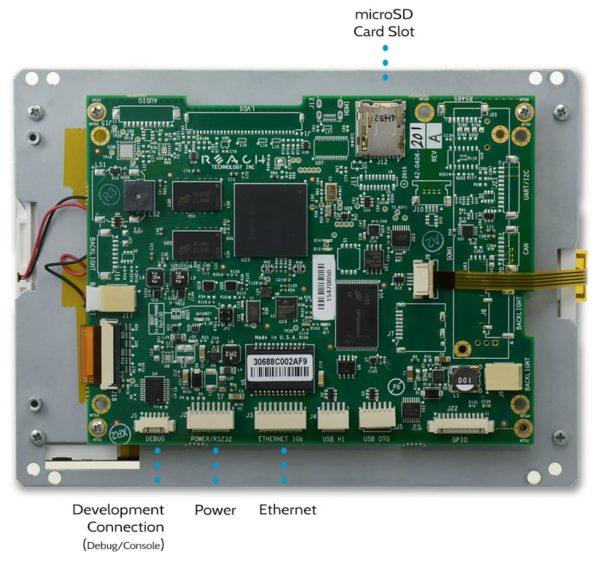
- Insert the SD Card into the SD Card Slot on the board.
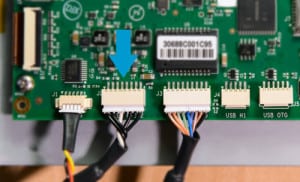
- Locate cable (Part Number: 23-0160-18) and connect the 8-pin PICO connector to the “POWER/RS-232 (J2)” on the Controller board.
- Connect the barrel connector from the Power Supply into the power cable jack on the POWER/RS-232 cable.
- Plugin the Power Supply power cord.
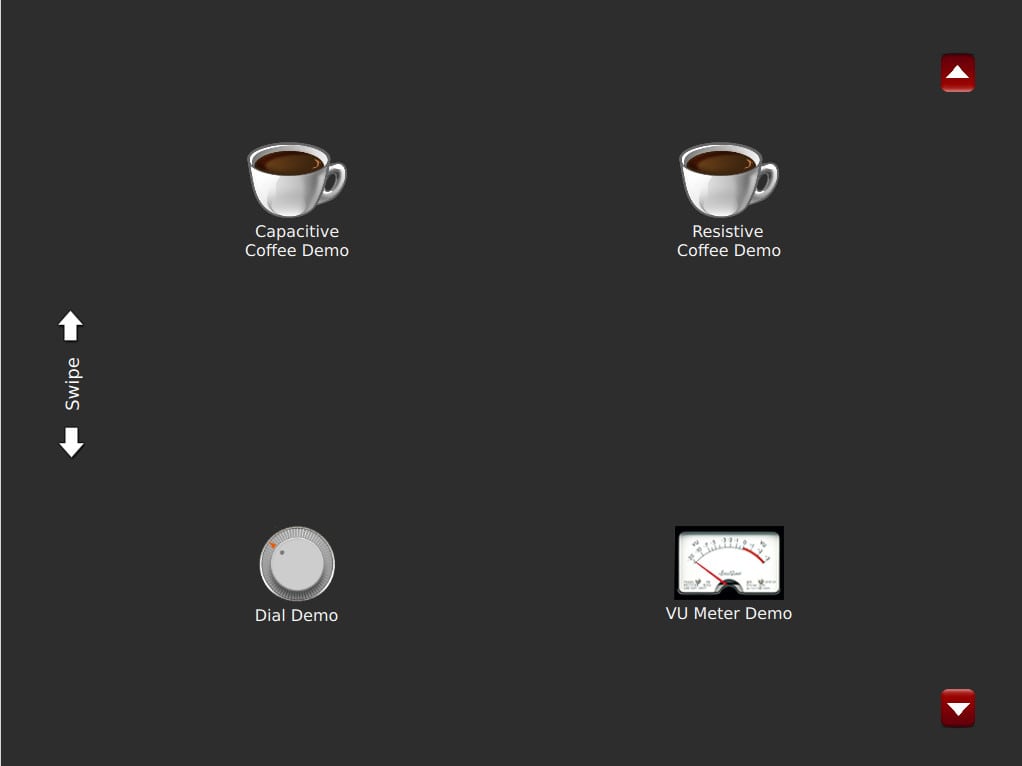
When the boot process is finished, you will be presented with a screen with several Qt demos showing various supported features. To scroll through the demos, use the buttons on the right (best with resistive screens) or the swipe area on the left (best with capacitive screens).
We suggest you run one of our sample applications to begin writing your own code.
Download Software
To get started developing your application, you will need to install:
- G2Link
- Qt Creator Installer
- Reach Sample QML Applications (found in Demos and Examples).
- Reach QML Components
You may also want to download the factory-installed Demo Application, found in Demos and Examples.
Install Software
G2Link
Extract the files from the G2Link .ZIP file into a convenient folder.
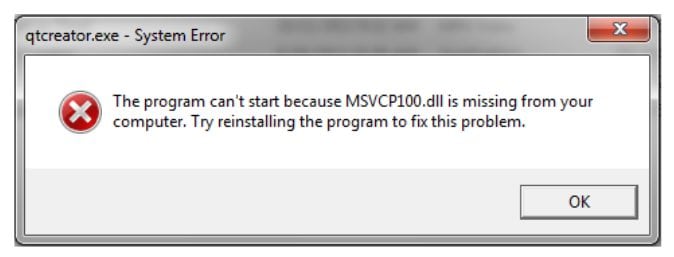
Qt Creator
Install Qt Creator. If it fails to load (and shows the error below), you need to install the Microsoft Visual C++ 2010 Redistributable Package (x86).
Reach Sample Applications
Extract the files from the Samples .ZIP file into the desired folder. Inside the Samples folder, you will see EmptyProject, IOexample, MVC, and States. EmptyProject is a template we provide for you to use when starting new projects. The other folders are example projects.
Reach Technology QML Components
Extract the files from the Reach Technology QML Components .ZIP file into the desired folder.
Inside the Reach Technology QML Components folder, you will see various files and folders, but the folder of interest is the “src” folder. In that folder, you will find the folders: components, images, and js. These folders contain the latest version of the Reach QML components. You can copy these folders into your project folder, overwriting the existing same-named folders.
Connect to Display Module
Once the installation is complete, connect the Development Kit Connection Cable (Part Number: 23-0161-72) to the Development Kit Connection Port “DEBUG” on the display module. Next, plug the connection cable into one of the open USB ports on your PC.
To upload programs to your module, you’ll need to locate the debug cable port.
Windows should recognize the device as a USB to Serial adapter and install the appropriate drivers. If not, you may need to install the drivers manually. The display module has a USB slave serial port, implemented via the FTDI FT232R chip. The VCOM drivers make this port look like a standard COM port to the PC. Drivers are available at ftdichip.com.
There are two choices for connecting the display module to your network. The wired solution simply plugs into your router using the supplied Ethernet Connector (Part Number: 23-0148-12) connected to the “ETHERNET” connector (and possibly the Ethernet Coupler and a user-supplied Ethernet cable). To connect via WiFi, plug the WiFi Dongle into the Standard USB Adapter, and attach the adapter to the USB Host “USB H1” on the display module.
Once these connections are made, power on the display module. Windows should detect and install the needed drivers.
G2Link
Browse into your “G2Link” folder and run “G2Link.exe”. Once G2Link has started, click Select Serial Port and pick a serial port from the drop-down box. Then click Apply and Close. On Windows, the port is usually COM4 or greater. G2Link will connect directly to the display module. If the program says, “Waiting for Target,” on the selected port or says, “Target not responding,” make sure the display module is plugged in and powered up.
If you chose to use the WiFi dongle to connect to the network, click the Network Setup button, then click I’m using a wifi dongle to connect to the network. Ask your network administrator for your SSID and network password. More details are on our Networking page.
There are several buttons in the middle of the G2Link window for interacting with the display module. These buttons send commands to the display module. These are described on the G2Link page.
Load Hello World Sample
In G2Link, click on the Publish and Run button and browse to your “Samples” folder, then to the “States” folder, and then click the OK button. Once you have the correct directory selected, click Go. This may take a few minutes as it clears the data off the display module and replaces it with the sample application. Once the process is complete the display module will restart its viewer and you should see the sample application. Click the Page 1 and Page 2 buttons to see Hello World.
Changing the Code
Now that you have run the sample application, explore updating the code running on the display module. Browse to your “Samples” folder, open the folder called “States”, and double-click the file called “States” to open up the project in Qt Creator (the file may say “States.qmlproject”).
Change “Hello World,” to something else. Double-click “Page2.qml” and notice that the text property of this page is “World.”. Change that property and save the file.
Now, in G2Link, select the folder “States” in the Publish and Run window like before, then click Go. This will download your change to the display module, and reboot the QML Viewer. You should see your change on Page 2.[/toggle_content] [/toggle][toggle effect=”blind” options=”swing” duration=”slow”] [div class=”trigger h3-trigger”]An Important Note[/div] [toggle_content] Your development kit ships with two microSD cards. Keep one of the cards as a backup so that you can always run the demo applications. DO NOT edit files on the backup SD card as you might not be able to get the demo applications running again.