microSD Card
Development Kits come with a microSD card that holds the display module’s operating system. It is highly recommended development is done on the SD card file system, because if something goes wrong it is easier to rewrite the SD card than to re-flash the NAND memory. The NAND image should be left alone until a production candidate is ready to be tested.
Using a Jumper to Select Boot Media
Turn the display module over and orient it so that the RS-232 port is facing away from you, then look for the jumper labeled JP2 (located below the RS-232 port). The two prongs on the left side of JP2 are the jumper leads which determine whether the module boots off of an SD card or NAND memory.
If no jumper is installed, the display module will boot from the SD card. If a jumper is installed, the display module will boot from onboard NAND (chip) memory.
It is highly recommended you boot from the SD card during development.
Preparation
- If needed, download the image from the Reach servers.
- The downloaded file is usually in the .zip file format or the .bzip2 file format and needs to be uncompressed to use. 7Zip can be used if no suitable application is installed on your computer.
- You should end up with a much bigger img file afterward.
- Make sure that your target microSD card is big enough to contain this file.
Writing a New microSD Card In Windows
The process of writing images to an SD card on a Windows PC requires the use of a free utility such as Win32 Disk Imager.
Create SD Card
 Download and unzip Win32 Disk Imager.
- Insert the SD card into your computer and check which drive letter it got assigned.
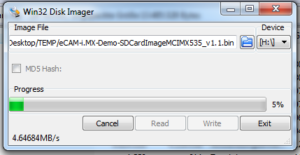
- Open Win32DiskImager.exe.Click the File Open Icon and select the unzipped .img file.
- Select the letter of your SD card in the device drop-down menu.
- Double-check if you have chosen the right drive! You may damage your PC or data otherwise.
- To start writing the image to the card, press the Write button. Note: This may take a couple of minutes.
- After the program is finished, eject your SD card.
- Insert it into your target device, which should be able to boot from it when selecting the “Boot From SD Card” boot mode.
Writing a New microSD Card in Linux
On Linux, use the 'dd'. command to rewrite the SD card. 'dd' is easy to use, but if used incorrectly your PC’s hard drive may be rewritten. It is prudent to backup regularly. Find more details on the 'dd' man page here.
First, locate the path to the microSD card:
$ mount
Look at the output and unmount anything mounted to /media. Note the command name is 'umount' not ‘unmount’.
$ umount /dev/sdb1
Also, make note of the location of Reach provided Linux .img file. For instance, it may be ~/Downloads/Reach-G2.img. Next use ‘dd’. if= stands for input file, and of= stands for output file.
$ sudo dd if=~/Downloads/Reach-G2.img of=/dev/sdb bs=4096
Press Return, enter your password, and 'dd' will copy the Reach image file to the SD card.
See Also
Embedded Touchscreens Made Easy:
Up in Days, Smoothly to Production. Get started with a Development Kit.
Reach Technology is now a part of Novanta.
Sales and Engineering
545 First Street
Lake Oswego, OR 97034
503-675-6464
sales@reachtech.com
techsupport@reachtech.com
Manufacturing
4600 Campus Place
Mukilteo, WA 98275
service@reachtech.com
Please send payments to:
Novanta Corporation
PO Box 15905
Chicago, IL 60693
accounts.receivable
@novanta.com